Pages

Showing posts with label Art Quilt. Show all posts

Monday, December 31, 2012

Thank you...

Thank Yous usually come at the end of blog posts, but I'd thought I'd break precedence and start off by expressing my gratitude to you, the loyal readers of Laurel's Quill.  In the three years since I started this blog, I've only accumulated 64 official followers, but the rest of you who tune in every now and again are among my most treasured and loyal "following".  In the three years since January, 2010, Laurel's Quill has had almost 9,500 page views, which means somebody must be interested. Though you may not be "official", I appreciate you and every person who visits or claims "I love your blog" or tells me "I love reading about the stuff you do".  Thank you all, from the bottom of my heart.

If I don't fall off the fiscal cliff, I plan to write, photograph and otherwise continue to document the "Stuff I do" in 2013. The project list is long this year and includes some "finishing stuff I do" and some "starting new stuff".  I hope you tune in, and leave me a comment or two...it pumps my ever needy ego...LOL!!!

Wait for it..................

More of this... sewing for Dress a Girl Around the World...why not join me at a sew fest??

I want to continue to challenge myself with more of this....


My furniture is pushing it's limit after 18 years, so why not do a little reupholster this chair...just not sure what color or pattern, but I'm pretty sure it's NOT going to be that hideous Emerald Green that is supposed to be the NEW color for 2013.


I WILL finish this art quilt, I promise....I actually tried it out in the family room...it's going to be a great addition to the Southwest thing we have going on in there.


I hope to take some stuffing out of Colette this year...maybe the Paleo diet?


Let's pay off some of these in 2013...in case the drop off the cliff is higher than we can all imagine...


And I think I will create the second volume of Laurel's Quill in hardback at the end of 2013. I used My Publisher to make a coffee table book of my favorite blog posts since the beginning of my blog.  It is important to preserve some of my writings, so I'm thinking I'll create a new volume every year...


My hubby is an avid reader of Laurel's Quill, so I thought about adding pictures of things that I'm putting on HIS HONEY-DO list for 2013...like the weather stripping on the front door, the window...never mind.  I better stick with my own list. 

Love you all, and THANK YOU AGAIN FOR READING LAUREL'S QUILL!!!

Happy New Year, and may all your dreams come true!


Laurel.  It's going to be a great year!
Sharing with


Friday, December 14, 2012

Inside Out...

You're making your way through a rack of clothes and you come upon a jacket labeled "Reversible".  Even though it's semi-ugly, the word triggers an automatic response - you can't resist taking it off the rack just to check out the inside. More than likely, if it's tacky on the outside, it's a given that the inside won't be much prettier. Perhaps it's the thriftiness in me, or the creativeness, I'm not sure, but I will always look at the inside, even though I have no intention of buying it. To me, "Reversible" usually means "bulky", "unattractive", or "I would NOT wear THAT on the outside!"

Some things are okay with their insides showing.  I spotted a knitted cowl in a yarn shop that I thought was kind of cute.

"It's reversible", the sales person said, like that fact alone was going to make me want to make it. I took a peak at the inside, and sure enough, the inside actually looked the same as the outside. Bonus! So I immediately purchased a nice soft turquoise wool and sure enough, it's going to be lovely...and reversible!


Some things are meant to be reversible...like a quilt.  When experts judge a quilt, they look at the back of it, just to see and judge the quality of the stitches. When you make a quilt for a bed, the back needs to be just as pretty as the front. I've only made one real bed quilt. I loved designing and sewing the quilt top, but hand quilting turned out to be not so much fun.  My Mom finished it for me. 


The back of an art quilt, on the other hand, doesn't usually show. It just hangs on the wall.  However, the art quilt aficionados will ALWAYS try to lift the quilt to see the back.  The intricacies of the quilted stitches and thread painting are what make art quilts "works of art".  I'm presently working on my second art quilt, inspired by the colors of New Mexico. I am using a multi colored thread in the bobbin, so the back of the quilt is quite interesting on it's own.  I have a long way to go!


Some things are not meant to show their insides...like drawers.


Certain things are sometimes prettier on the inside...like people.  Unfortunately - or maybe not - we often hide our "inside" self to the world, only trotting it out for special people. We are basically vulnerable people, exposing our underbelly to those whom we trust, those whom we love.  We live on the outside, editing our words and curbing our actions to fit in, to be liked, to be okay.

Often, who we are "on the inside" has far more value than we ourselves believe.  In truth, we are complex and messy creatures...a wonderful mish-mash of beauty and ugliness, intelligence and stupidity, grace and clumsiness, generosity and selfishness, creativity and indifference, calm and angst, confidence and insecurity. Inside and out, we are "fearfully and wonderfully made".

Praise the Lord...we are reversible!


Laurel.  Inside Out.


Sharing today with Best Posts of the Week


Sunday, July 29, 2012

Art Quilt 2...

Let the Games Begin!!

Got batting...check.

Got backing...check.

Cut fabric...check.

Complete sandwich...check.


Set up the Viking...try to rmember needle size, presser foot, etc...check.


See if you can remember how to work the quilt through the machine...check.

Practice...check.


Adjust your light source, find your tools....check.


Freak out, turn everything off and go to the Mall.

Laurel.  I'll start tomorrow.


Friday, July 20, 2012

Colette and the art quilt

My mini-me Colette has been languishing in the craft room waiting for some attention. I had picked up some nice fabrics in Dallas and Santa Fe to make her some nice frocks, but they remain in a pile in the guest room. Last night, Project Runway Season 10 started and after watching the designer contestants roll out some pretty bizarre pieces, I heard an audible sigh from Colette.

She has good cause to be frustrated. My brain and fingers have been centered on my sewing machine, but alas not for outfits for her.The lure of the new art quilt relegated her to second fiddle again this week, as I worked to finish the applique portion. Despite her quiet glare behind me, I trudged onward. I am pleased that it is completed.


Even today I've made some minor changes since these photos were taken. I will be starting on the "sandwich stage" next, probably using a light cotton batting and a solid backing...then listen for my little Viking purring long into the night doing the machine quilting portion!

So back to Colette...because I felt so bad for her today, being naked and all, I made a little knit top this afternoon out of one of my Dallas fabrics.  This silk knit is feather light and was a little difficult to manage, but the result was good.


love the color...looks so great with turquoise... 


Smile Colette, you're a STAR!!! And because Mommie started walking this week, she may end up ratcheting your boobs down a notch or two in a few months!


Laurel. At least you can actually wear my stuff, Project Runway!

Monday, July 16, 2012

Seeing Red...

I love finishing stuff. This past weekend I worked furiously on my new art quilt (another post for another day:) and I completed the applique portion - a huge accomplishment, since it took me over a year to do the California Harvest art quilt, and I've only been at this one for a month or so.

As you may know, I haven't put the same zeal into making jewelry of late. Call it burn out or "the end of an era" - whatever- but I haven't been selling my jewelry these days. The last of my normal cache of 80 to 100 necklaces was sold to my friends/customers last Spring and I have only made a few custom pieces since. I have reverted to my old "I-need-something-to-wear-with-that-I-better-whip-something-up" style of jewelry making...not thinking about selling so much...more about the pure joy of creating beauty and style.

I don't think that I am much different from other artists who one day find markets for their wares, then get caught up in making a buck off their talents. It doesn't take much success to spurn us on and before we know it, we have begun to adulterate our art to appeal to the masses. Everything has a price tag. It's sad in a way, as there is little else more satisfying then creating a masterpiece just for the pure joy of finishing it, knowing it may never grace a wall, or in my case, any neck but my own.

My favorite jewelry pieces are those that only the most brave fashionista would wear...go BIG, go BOLD and for Heaven's sake, if you're going to wear jewelery, MAKE A STATEMENT!!! The 7 Eleven, Bounce Town or a favorite Mexican Food restaurant would not normally see the likes of anyone walking in adorned with one of these little creations. 

I start with thin wire and a few beads and just start twisting and weaving, adding beads as I go. And since I adore sparkle, I picked the beads and baubles with the brightest colors and shine for this one. I didn't choose red, it chose me. I spyed ONE RED BEAD in a shop a few months ago and it became the inspiration for this necklace:


The beginning of a masterpiece 
Add more beads, more wire, more twisting, more weaving and....


So I'm thinking I'll wear it to Walmart today when I go pick up detergent...
with a crisp white sundress and some red flip flops.

Laurel. I need a party!


Linking up with

Saturday, June 30, 2012

Saturday Dilemma

Even though I have been retired from a hectic corporate job for almost 5 years, I still look forward to the weekend.  When I worked I would think about all the crafty things I could do when the weekend came.  It went something like this:

Monday: "I hate Mondays...I'm back at this desk again and what did I accomplish over the weekend?"
Tuesday: "Maybe I'll work on that necklace tonight?"
Tuesday Night:  "I'm tired..I need to just sit...watch some mindless sitcom."
Wednesday: "I need to get started on that tablecloth this weekend.  I can't wait to just sit and sew."
Thursday: " I shoulda organized my beads last night instead of watching American Idol. oh well I'll do it on Saturday."
Friday: "Thank God this week is almost over." Think I'll call Mary and see if they want to go out to eat tonight."
Saturday: " It's already too late for the Farmer's Market, but I can hit that garage sale up the street. I'll sew this afternoon."
Saturday Afternoon: "let's have Mary and Joe over for dinner tonight...I'll make French Cassoulet."
Saturday Night: "I should have read that summary for the meeting on Monday...I'll do it tomorrow before church."
Sunday afternoon: "The Cowboys are playing the Broncos? I can finish that necklace later."
Sunday evening: "Sure, I can make those earrings for you Mary...I can whip them out in a day or so."
Monday morning: "I accomplished nothing this weekend. It went so fast! I'm back at this desk..I'm exhausted...BUT, only five more days til the weekend, and I'll do all the things I want to do...I'll be so creative...I rock!"

So here I am...still...it's Saturday morning and I am facing the Saturday dilemma:  What should I do today?

Work on the Art quilt?


Finsh the Art Necklace ? Who's going to wear this thing anyway?


I could sew and give Colette something to try on...


Or I could keep plugging away on this shawlette...


But I really need to pay bills this morning...and go get some fresh veggies from the Farmer's Market...I should go to the grocery store, but I hate going on Saturdays.  I wonder if there are any cool garage sales today? We need to go get fireworks too.  I should think about what to cook for the Fourth...I wonder what Costco has for meat? Ribs?

Well, I'll do all that stuff and be done so I can relax and work on these projects this afternoon...

Boy, this sewing room is a mess! You need to clean it up this afternoon, Laurel!

Wednesday, February 15, 2012

California Harvest - an art quilt...

I had a whole list of things I was going to do when I retired: travel, read, sew, make jewelry, paint, etc. Upon retirement, I purchased two things that I had coveted for years - an 6' ebony grand piano and a Viking sewing machine that all but talks back to you. My goals were to take lessons on the piano and make an art quilt.  I had visited a fiber artist's studio loft downtown and was impressed by the creative way she worked with patterns, textures and colors. Her pieces were huge and in demand in commercial office spaces and hotels all over the world.  I wanted to try my hand at making a large "quilt", as is my style - to jump in way over my head when trying something new.

My hubby had planted sunflowers several years ago in our back yard, and together with some heirloom tomatoes, I created the prettiest still life on my kitchen counter one summer evening.  I wanted to capture the beauty so snapped a couple of pictures. Just for fun I started messing with the image in Photoshop, blurring the background. I loved the result and I decided that this photo would be the subject of my first art quilt.

Hurdle No. 1)  Create a pattern.

I took the digital file of the photo and entered it into a cross stitch pattern maker called PC Stitch.  The computer program converts a photo into a mass of tiny pixels and if you had every DMC floss color in the world (which I do), it would take you a year to stitch it.  So I simplified the color palette and created white borders around the shapes that I wanted to eventually convert into fabric. When I printed out the pattern sheets for the whole picture, I had twenty-five 8 1/2" X 11" pages.


Hurdle No. 2) Matching the pattern pieces

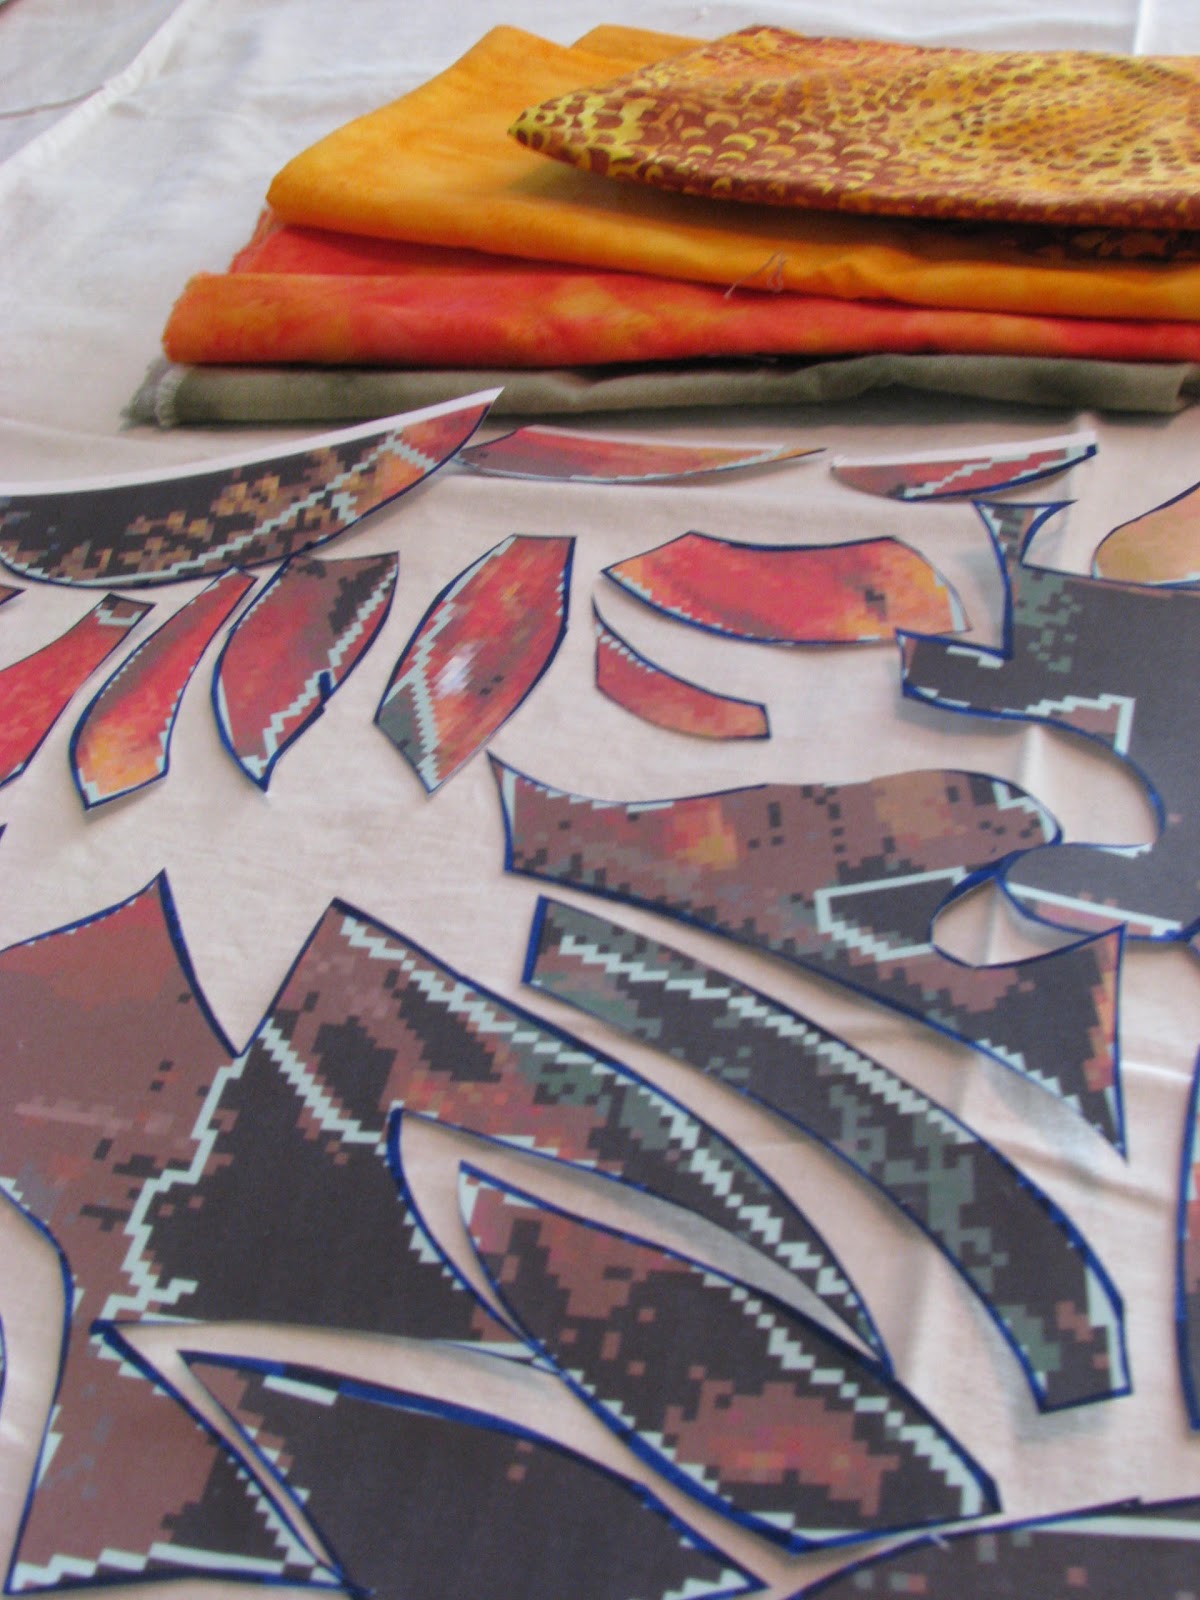
Because I decided to do this quilt in squares (not sure that was the wisest of decisions) the individual elements of the bouquet and background overlapped into multiple squares.  So each fabric piece, each petal, each leaf had to be matched with it's adjoining sections.  What a pain.


I decided that I wasn't going to use the traditional applique technique, but just pin the pieces on a white backing and use a machined blanket stitch.  That's actually a slight fib - I didn't know how to do the traditional applique techniques.  But it all worked out.  I started on one row and quickly discovered that I probably should have gone left to right and top to bottom.  It was difficult and time consuming to match the elements, especially with the detailed flowers. I changed threads on each element to match each new color of fabric. Lot's of tag ends to clip!!

Hurdle No. 3) Every quilt needs a back!


Choosing the batting was easy.  Since my squares were rather weighty and thick in some areas, I wanted the batting to be light weight.  Someone recommended a natural cotton.  The fabric for the back of the quilt was a little harder to pick.  I thought perhaps a batik with a pattern might camouflage my irregular and erratic machine quilting.  I used a multi color cotton thread for the bobbin, so the stitching on back would be somewhat uniform.

Hurdle No.4) The quilting

I knew that someday I was going to have to face the actual quilting of my project.  My new Viking was capable of free motion quilting. but I had never done it before.  The Answer - take a class! I practiced and practiced to get a good rhythm and learn how to work the fabric through the feeder foot, but I was totally stymied by the many patterns within the project.  I wanted it to look like a painting with thread, but didn't know how to get there.  I had a friend who is an excellent quilter come over and give me some ideas of stitching patterns, and after quite some time (I must have just stared it for over a month), I decided to dive in and just start sewing.  The more I stitched, the easier it became, and the farther I got, the more fun and intricate my patterns became.


Almost one year from the start, I finished my quilt, and dubbed it California Harvest. It measures 38" X 48" and hangs in my dining room. I still enjoy looking at it.


It's been a couple of years since I completed California Harvest.  A quilting friend of mine sponsored my work in a regional quilt show, and it was so gratifying to watch the  seasoned quilters gaze and admire it. It's not perfect by any real quilter's standards, but it was an accomplishment for me just to actually finish it! Amazingly, I am just about ready to try another one. I rather doubt I will use the same technique - there's got be an easier way:)

Laurel
Happy quilting!

Related Posts Plugin for WordPress, Blogger...